


The Ultimate Latte Makeup Look: A Complete Guide to Effortless, Creamy Neutrals
If there's one makeup trend that has completely stolen my heart this year, it's the latte makeup look. You know what I'm talking about – those warm, creamy, cappuccino-inspired tones that make you look like you just stepped out of a cozy coffee shop, glowing and gorgeous without trying too hard.
There's something incredibly appealing about this aesthetic. It's not the bold, dramatic makeup that screams "look at me!" Instead, it's that subtle, sophisticated approach that whispers elegance. It's the kind of makeup you can wear to literally anything – your 9 AM Monday meeting, weekend brunch with the girls, a casual date, or even a fancy dinner. It just works.
I recently discovered this amazing product breakdown that perfectly captures the essence of the latte makeup look, and I honestly couldn't wait to share it with you. Let me take you through each product, why it's essential for this aesthetic, and how to use it to create that dreamy, warm-toned look we're all obsessing over.
The Canvas: Creating That Perfect Base
NARS Light Reflecting Foundation
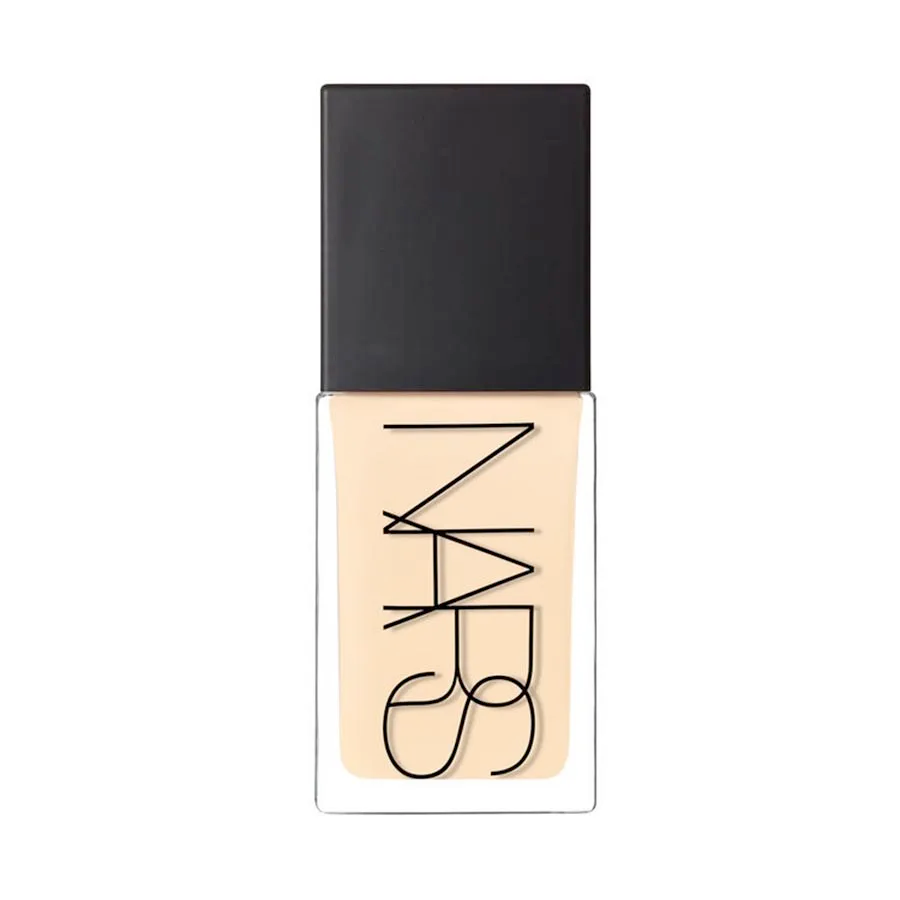
Let's start with the foundation – and not just any foundation, but one that truly understands the assignment. The NARS Light Reflecting Foundation is an absolute game-changer, and here's why.
First off, this isn't one of those heavy, full-coverage foundations that make your face look like a mask. You know the ones I'm talking about – where you can literally see where your foundation ends and your neck begins? Yeah, we're not doing that anymore. This foundation is all about that "no-makeup makeup" vibe, but better.
The formula contains these tiny light-reflecting particles that catch the light in the most beautiful way. It's not glittery or shimmery – it's more like your skin is naturally luminous and healthy. Think of it as Instagram's "soft focus" filter, but in real life. The coverage is buildable, so you can go light for everyday or layer it up for more coverage when you need it.
What I love most about this foundation is how it wears throughout the day. It doesn't oxidize (you know, when your foundation mysteriously turns orange after a few hours), it doesn't separate, and it doesn't sink into fine lines. It just sits beautifully on your skin, looking fresh from morning to night.
The finish is what they call "satin" – not matte, not dewy, but that perfect in-between that looks like naturally gorgeous skin. For the latte makeup look, this is exactly what you want. You're going for that effortless, barely-there base that lets all your other products shine.
Pro tip: Apply this with a damp beauty sponge for the most natural finish. Start in the center of your face and blend outward. You'll use less product and get better coverage where you actually need it.
Setting the Stage: Making Your Makeup Last
Urban Decay All Nighter Setting Spray
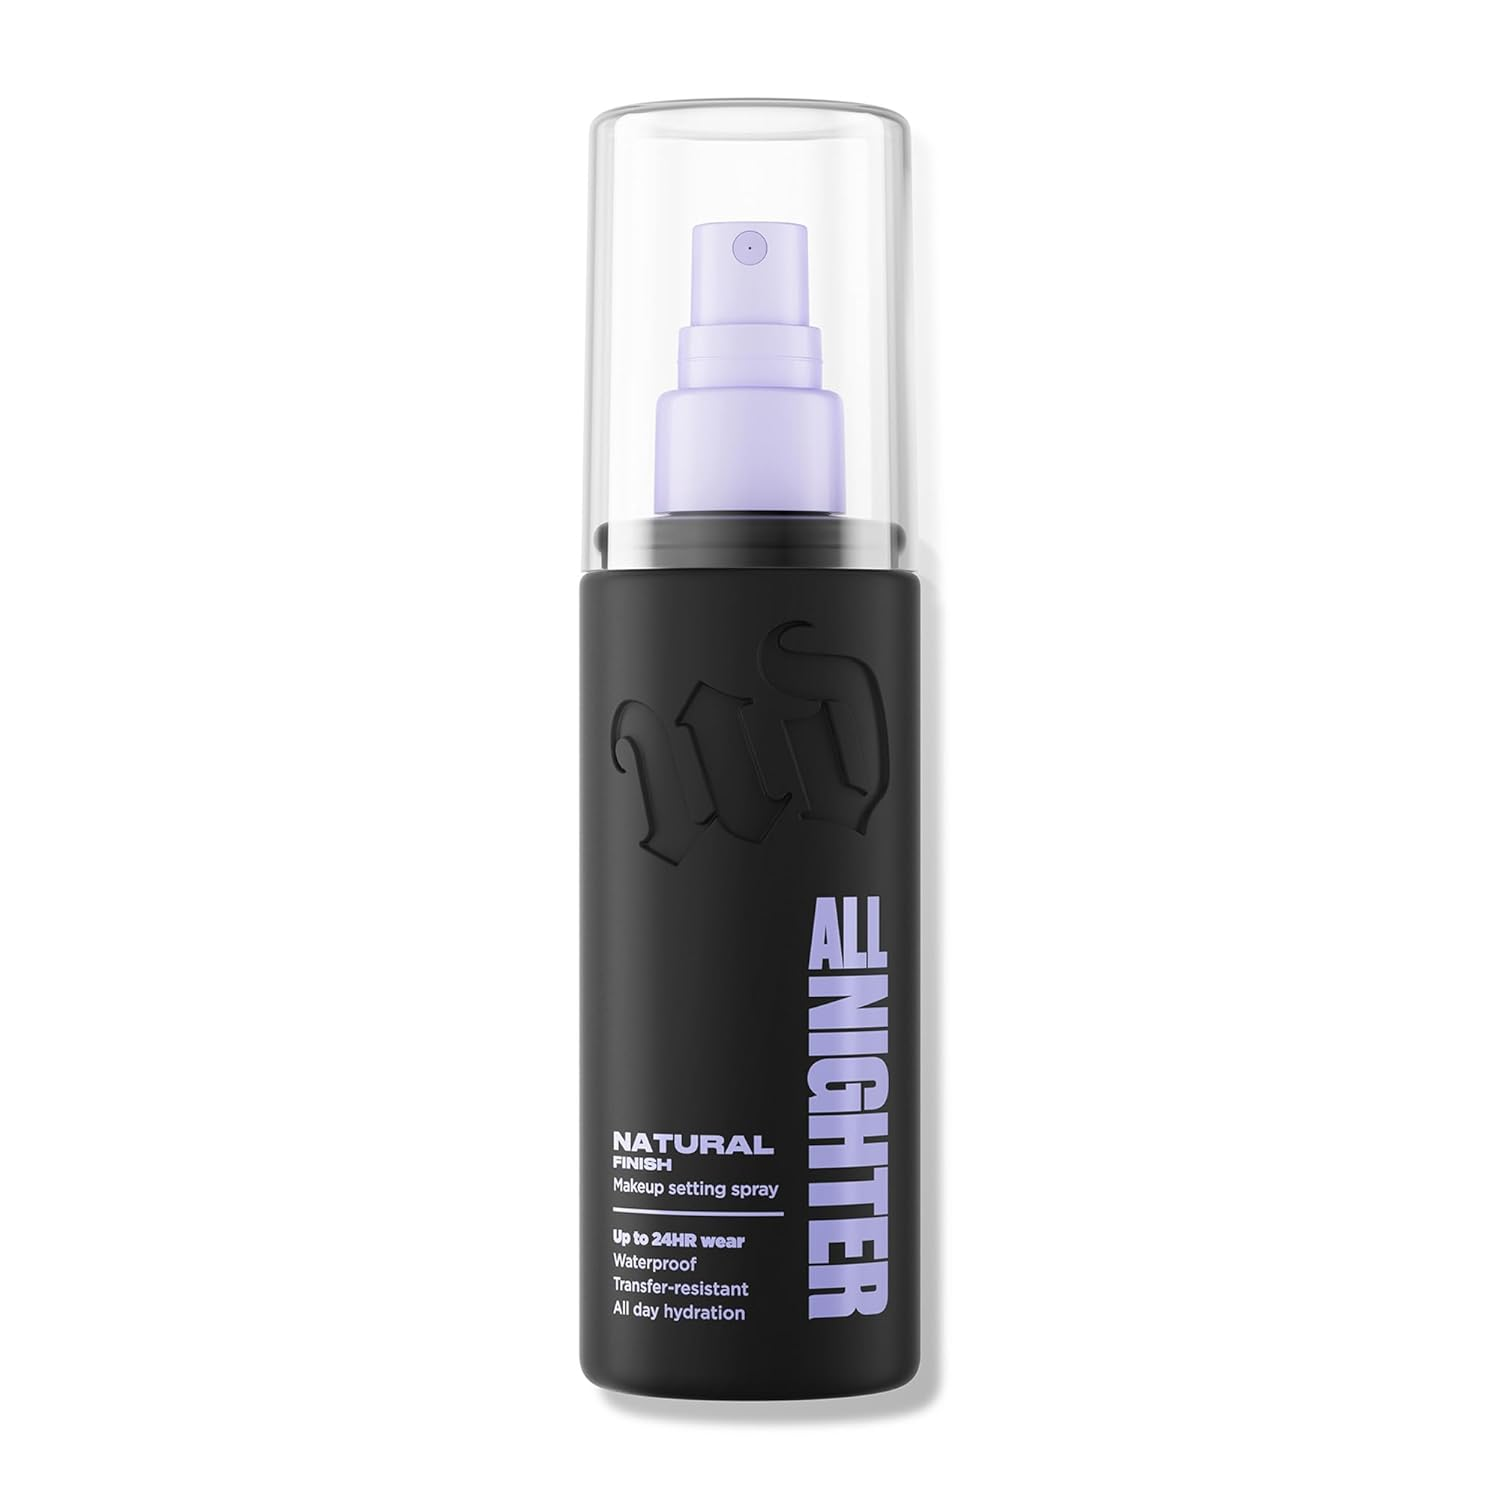
Okay, real talk – I used to think setting spray was just fancy water that makeup companies marketed to make extra money. I was so wrong, and I'm not afraid to admit it. Urban Decay All Nighter Setting Spray literally changed my makeup game.
This stuff is like an invisible shield for your face. Once you spray it on, your makeup isn't going anywhere. I'm talking 16+ hours of wear. Whether you're dealing with summer humidity, a long day at the office, hitting the gym (okay, maybe not for a full workout, but you get the idea), or dancing all night at a wedding, this keeps everything locked in place.
But here's what makes it different from other setting sprays – it doesn't make your makeup look stiff or feel uncomfortable. Some setting sprays leave your face feeling tight and weird, like you can't smile properly. Not this one. Your makeup stays put, but your skin still feels like skin. You can touch your face (I know, we're not supposed to, but we all do it) and it still feels soft and natural.
For the latte makeup look specifically, this is crucial because you're working with cream products, powder products, and everything in between. The setting spray helps them all meld together and become one cohesive, beautiful finish instead of looking like separate layers sitting on top of your skin.
How to use it: Hold the bottle about 8-10 inches from your face and spray in an X motion, then a T motion. Let it dry naturally – don't fan it or blow on it. Just give it a minute, and you're golden.
The Eyes: Where the Magic Happens
Charlotte Tilbury Pillow Talk Eyeshadow Palette

If I had to pick just one palette to use for the rest of my life (dramatic, I know, but stay with me), it would probably be the Charlotte Tilbury Pillow Talk Eyeshadow Palette. This is, hands down, one of the most beautiful, versatile, and foolproof palettes I've ever used.
Let me paint you a picture of what's inside: four gorgeously curated shades that work together like a dream. You've got this beautiful champagne shade that's perfect for all-over lid color or as a highlighter for your inner corner and brow bone. Then there's this stunning matte peachy-brown that's ideal for your crease – it adds warmth and definition without looking harsh or muddy.
The third shade is this incredible shimmery rose-gold that catches the light beautifully and makes your eyes look bigger and more awake. And finally, there's a deeper chocolate brown that you can use to define your outer corner or even as a soft eyeliner along your lash line.
What makes this palette so special for the latte makeup look is the warmth. These aren't cool-toned grays or harsh blacks. These are soft, warm, inviting shades that complement the whole creamy, cozy aesthetic we're going for. They're the eyeshadow equivalent of your favorite caramel macchiato.
The formula is absolutely buttery. These shadows blend themselves – I'm not even exaggerating. You can use a brush, your fingers, whatever. They just melt into your lids and into each other, creating these beautiful, seamless transitions. There's minimal fallout, great pigmentation, and they last all day without creasing.
You can create so many different looks with this palette. Want something super subtle for the office? Use the champagne all over and the peachy-brown just in the crease. Going out for dinner? Add that rose-gold shimmer on the center of your lid and deepen the outer corner with the chocolate shade. It's endlessly versatile.
My go-to look: Champagne all over the lid, peachy-brown in the crease, rose-gold on the center of the lid and inner corner, and a tiny bit of the chocolate shade on the outer corner and lower lash line. Chef's kiss.
The Lashes: Subtle but Stunning
Maybelline Lash Sensational Mascara
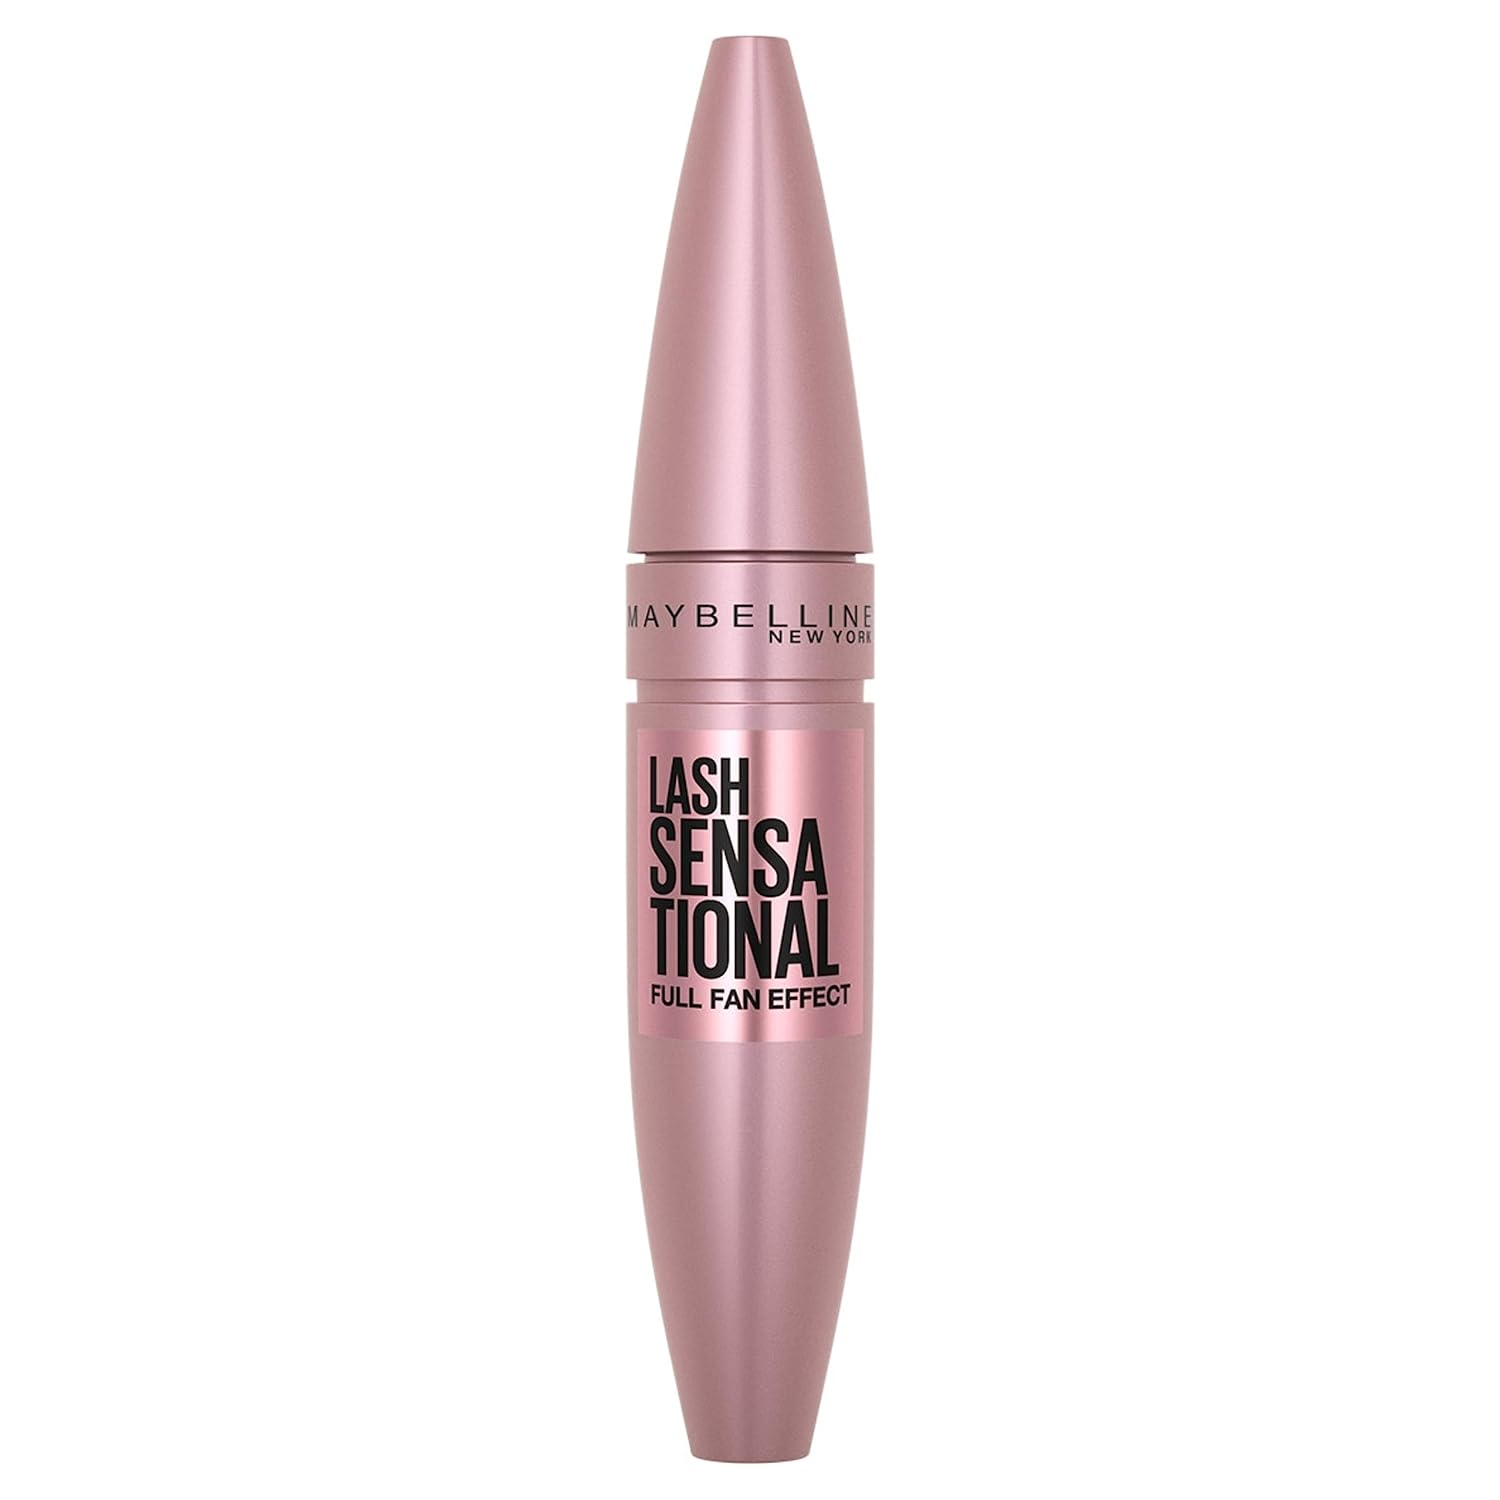
Let's talk about mascara. The Maybelline Lash Sensational Mascara is one of those drugstore heroes that can absolutely hold its own against high-end mascaras. I've tried mascaras that cost $40+, and honestly? This one performs just as well, if not better.
The brush is genius. It's got this curved shape that hugs your lashes and really gets in there to coat every single one. The bristles are densely packed but not so much that you get clumping. It separates, lengthens, and adds volume all in one go.
For the latte makeup look, you don't want super dramatic, spidery lashes. You want that naturally full, fluttery effect – like you were just born with amazing lashes. This mascara gives you exactly that. Your lashes look longer and fuller, but still natural and soft.
The formula doesn't flake, which is huge for me. There's nothing worse than looking in the mirror halfway through the day and seeing little black specks under your eyes. This stays put without being impossible to remove at night. Just regular cleanser or makeup remover, and it comes right off.
It also doesn't smudge, even if you have slightly oily lids or you're wearing it in humid weather. Once it dries, it's not going anywhere until you want it to.
Application tip: Wiggle the wand at the base of your lashes, then pull through to the tips. Do 2-3 coats, letting each one dry slightly before adding the next. And don't forget your lower lashes – just use the tip of the wand for a subtle definition.
The Glow: Illumination That Looks Real
Saie Glow Gel Highlighter
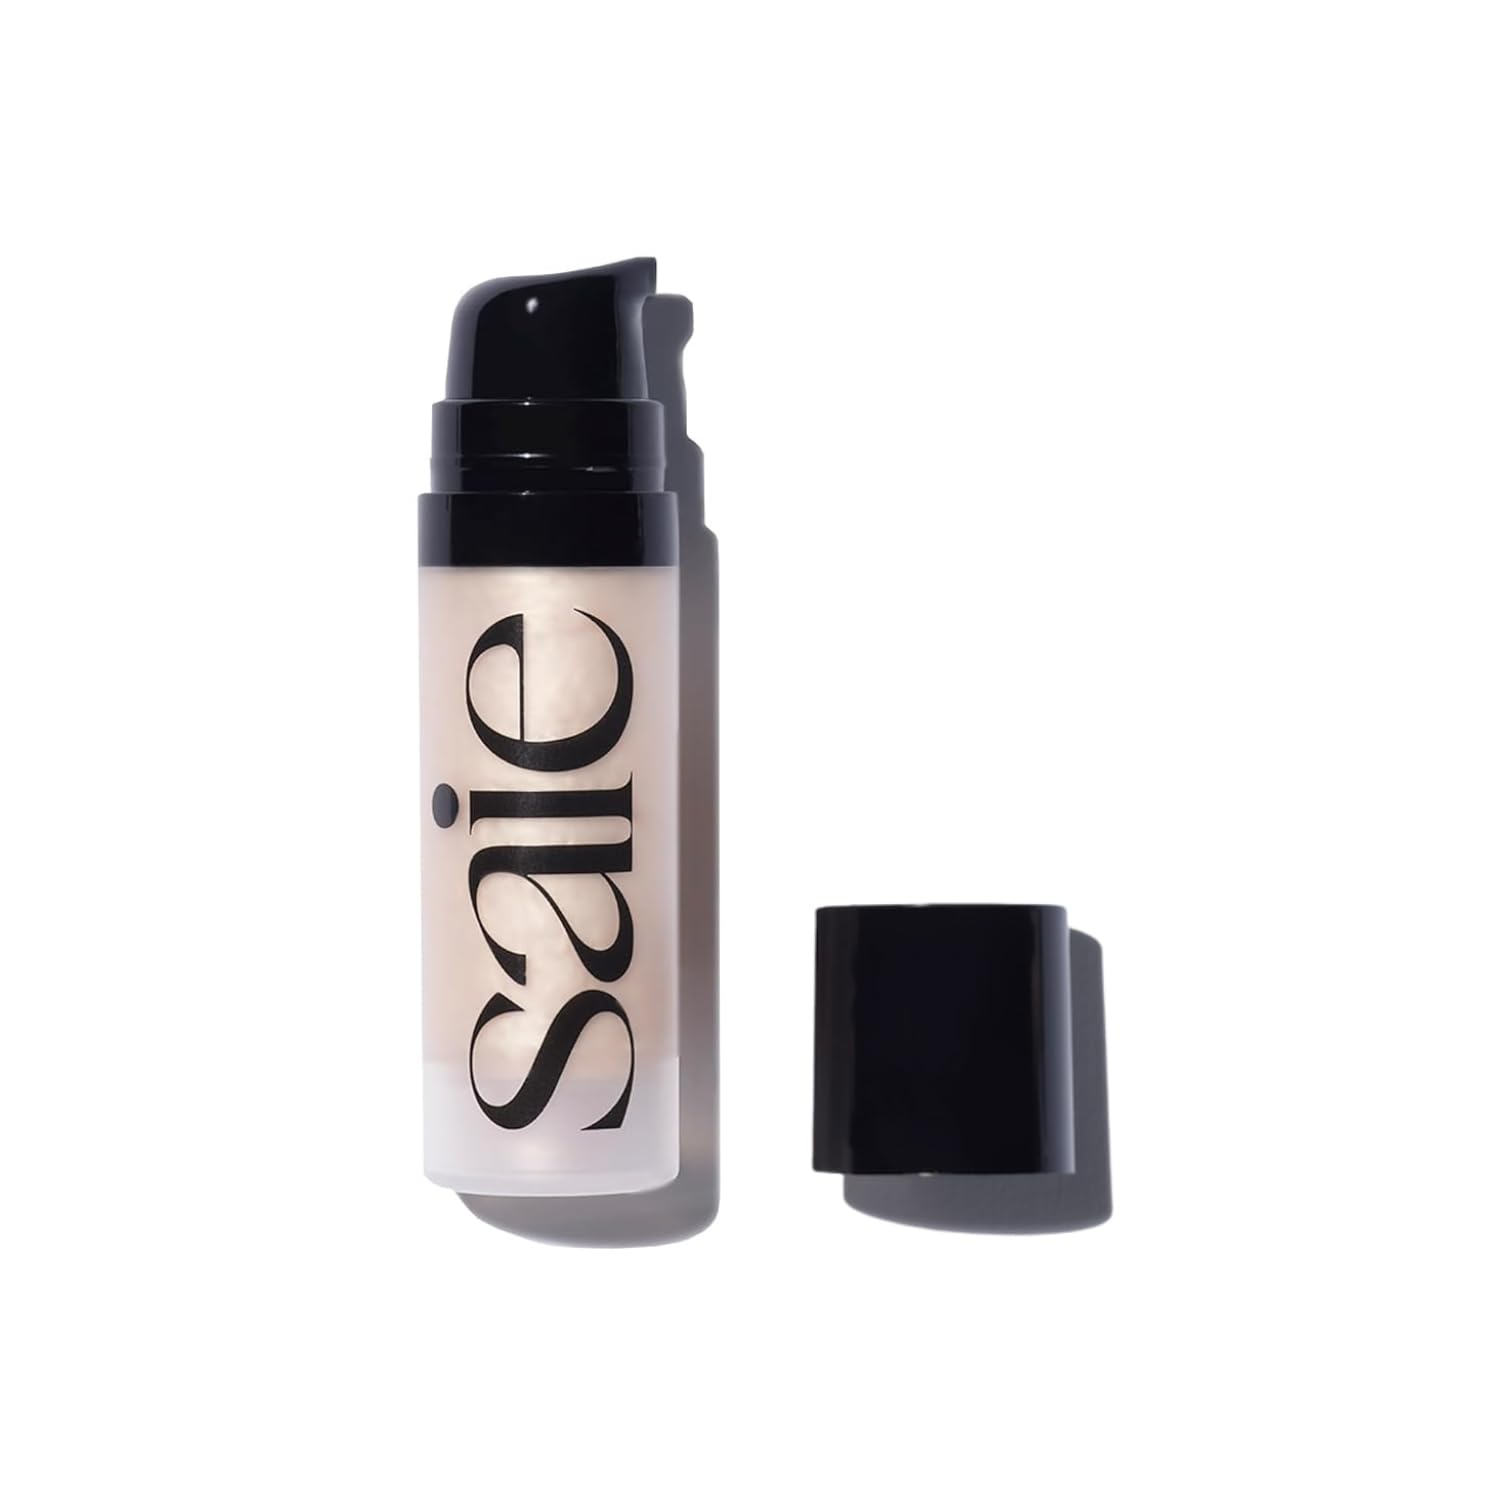
Highlighting can make or break a makeup look. Too much, and you look like a disco ball. Too little, and your face can look flat. The Saie Glow Gel Highlighter is the Goldilocks of highlighters – it's just right.
This is a cream-gel formula, which means it melts into your skin instead of sitting on top of it like powder highlighters sometimes do. The finish is dewy and wet-looking (in the best way), like you just finished a really good facial or you're naturally glowing from within.
What I love about this highlighter is how subtle yet impactful it is. You're not getting chunky glitter or obvious shimmer. Instead, it's this soft, diffused glow that catches the light naturally. It looks like your skin is just healthy and luminous, not like you applied a product.
The formula is buildable, too. You can do one light layer for a subtle glow or layer it up for more intensity. It works beautifully with the NARS foundation we talked about earlier – they complement each other perfectly, creating this cohesive, glowing base.
For the latte makeup look, this highlighter is essential. It adds that dimension and luminosity that makes the whole look come alive. Without it, your face might look a bit flat. With it, you look radiant and alive.
Where to apply: The high points of your cheekbones (blend up and back toward your temples), down the bridge of your nose, your cupid's bow, the inner corners of your eyes, and just a tiny bit on your brow bone. You can even mix a tiny bit into your foundation for an all-over glow.
The Blush: That Perfect Peachy Flush
Milani Luminoso Blush

If you've been in the makeup community for any length of time, you've probably heard people raving about Milani Luminoso Blush. And you know what? Every bit of that hype is deserved. This blush is absolutely stunning.
The color is this gorgeous peachy-pink with the most beautiful golden sheen. It's not straight-up pink, not orange, not coral – it's this perfect peachy tone that somehow looks good on everyone. I'm serious. I've seen this blush on fair skin, medium skin, deep skin – it's universally flattering.
The golden shimmer throughout is subtle but noticeable. It's not glittery or chunky; it's more like a soft, luminous sheen that makes your cheeks look naturally flushed and glowing. Like you just came back from a walk on a beautiful day and your cheeks are rosy and radiant.
The formula is smooth, pigmented, and blendable. You don't need to dig your brush into the pan to get color – a light swipe is enough. And it blends seamlessly into your skin without any harsh lines. It plays well with the highlighter, too. Together, they create this beautiful, dimensional glow on your cheeks.
For the latte makeup look, this blush is perfect because it adds warmth without being too bright or too cool-toned. It fits right into that creamy, warm aesthetic we're creating. It's like adding just the right amount of cream to your coffee – it rounds everything out and makes it perfect.
The lasting power is impressive, too. This blush stays put all day without fading. By the end of the day, when some of my other makeup might have worn off a bit, this blush is still going strong.
How to apply: Smile and apply to the apples of your cheeks, blending back toward your temples. You can also add a little bit to your temples and even your nose bridge for a sun-kissed, monochromatic look that's very on-trend right now.
The Bronze: Warmth and Dimension
Rare Beauty Warm Wishes Stick
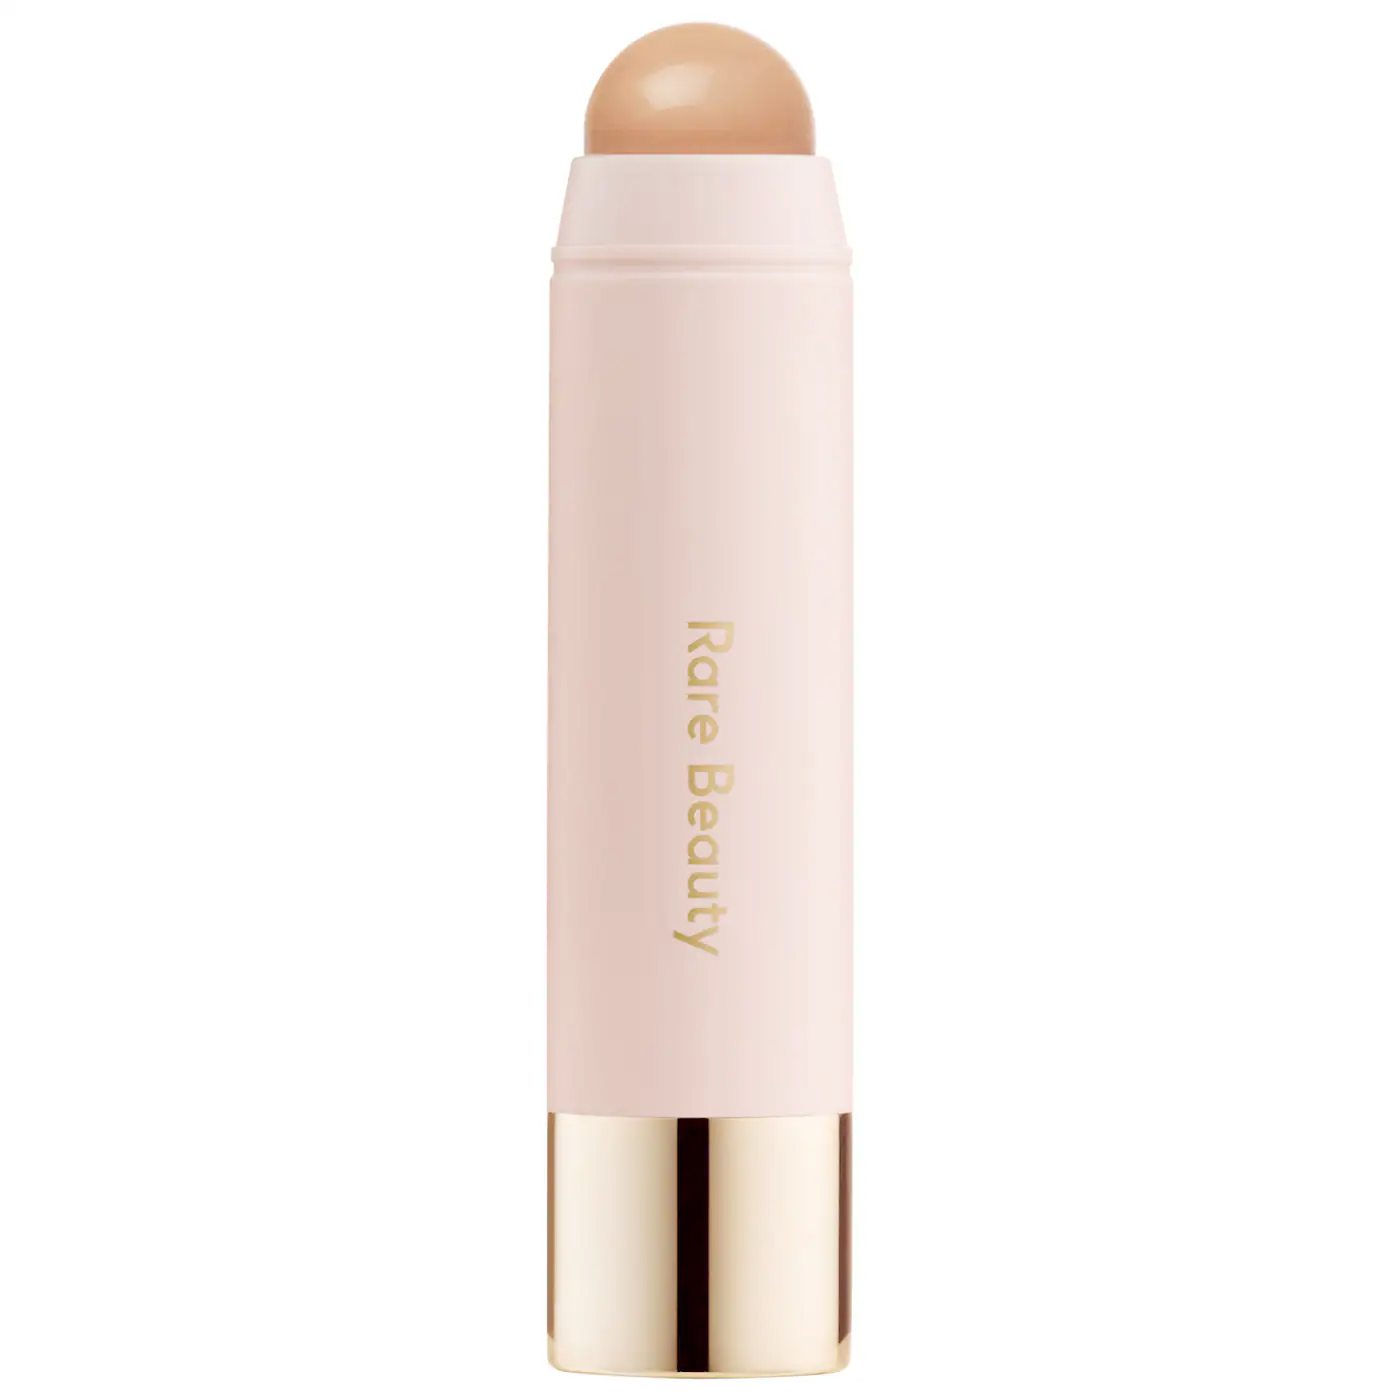
Bronzer is often overlooked in neutral makeup looks, but it's actually super important. The Rare Beauty Warm Wishes Stick is a cream bronzer that makes adding warmth and dimension to your face ridiculously easy.
Cream bronzers are superior for the latte makeup look because they blend seamlessly with your cream foundation and highlighter. They all meld together to create this beautiful, cohesive finish that looks like skin, not like separate products sitting on your face.
This particular stick is genius because it's so easy to apply. You literally just swipe it where you want it and blend with your fingers, a sponge, or a brush. The formula is creamy and blendable – it gives you plenty of working time before it sets, so you don't have to rush or panic about blending it perfectly in two seconds.
The color is a beautiful warm brown without any orange undertones. This is crucial. Orange bronzer is everyone's worst nightmare. This one just adds natural-looking warmth and dimension, like you spent some time in the sun (but, you know, without the UV damage).
You can use this as a bronzer to warm up your face, as a contour to add definition to your cheekbones and jawline, or both. The buildable formula means you can go subtle for day or add more intensity for evening. It's versatile and foolproof.
Application guide: Apply in a "3" shape on each side of your face – along your hairline, down the side of your cheekbone, and along your jawline. Blend well. You can also apply it down the sides of your nose for a more contoured look and even on your eyelids as a cream eyeshadow base.
The Finishing Touch: The Perfect Nude Gloss
NYX Butter Gloss in Brownie Drip

Last but definitely not least, we have the NYX Butter Gloss in Brownie Drip, and let me tell you, this is the perfect finishing touch to the latte makeup look.
First, can we talk about how perfect this name is? Brownie Drip. It's literally describing the exact vibe we're going for with this whole look. It's that delicious, creamy, chocolatey nude that makes your lips look naturally gorgeous and perfectly complements all the warm tones we've been building up.
The color is this beautiful nude-brown that somehow manages to not wash anyone out. It's not too pink, not too brown, not too beige – it's just right. It enhances your natural lip color instead of covering it up completely. It's like the "your lips but better" of lip glosses.
The formula is incredible. It's called "Butter Gloss" for a reason – it feels so smooth and comfortable on your lips. It's glossy without being sticky (you know that annoying feeling when your hair gets stuck in your lip gloss? Yeah, not happening here). It's hydrating, so your lips actually feel better after wearing it. And the best part? It smells like vanilla cupcakes. I'm not kidding. Every time you apply it, you get this little hit of deliciousness.
The finish is that perfect glossy shine that makes your lips look fuller and more plump. It catches the light beautifully and adds that final touch of polish to your makeup look. With everything else being somewhat matte and diffused, this gloss adds a nice contrast and makes your lips the focal point.
It wears comfortably for hours, though you'll want to reapply after eating or drinking (like any gloss). But it doesn't dry out your lips or leave that weird ring around the edges of your mouth as it fades.
Pro tip: Apply it straight from the doe-foot applicator for full coverage, or just dab a little in the center of your lips and blend outward with your finger for a more subtle, just-bitten look. You can even layer it over any nude lipstick you already love for added dimension and shine.
Putting It All Together: The Complete Latte Makeup Tutorial
Now that we've broken down each product, let me walk you through exactly how to create this gorgeous latte makeup look from start to finish.
Step 1: Prep Your Skin Start with a clean, moisturized face. Let your moisturizer sink in for a few minutes before you start applying makeup. If you use primer, now's the time. I personally skip primer with this foundation because it performs beautifully on its own, but do what works for your skin.
Step 2: Apply Your Base Using a damp beauty sponge, apply the NARS Light Reflecting Foundation. Start in the center of your face and blend outward. Use less product than you think you need – you can always add more. Make sure to blend down your neck and into your hairline so there are no harsh lines.
Step 3: Cream Products First Now apply all your cream products: the Rare Beauty bronzer, Saie highlighter, and Milani blush. Applying them in this order (before powder eyeshadow) helps them blend seamlessly together. Remember the "3" shape for bronzer, the high points for highlighter, and the apples of your cheeks for blush.
Step 4: Eyes Take Center Stage Time for that beautiful Pillow Talk palette. Start with the champagne shade all over your lid. Then use the peachy-brown in your crease, blending back and forth until it's soft and diffused. Add the rose-gold shimmer to the center of your lid and inner corner. If you want more definition, use the chocolate shade on your outer corner and blend it into your crease. Don't forget to add a little bit of the champagne shade to your brow bone as a highlight.
Step 5: Lashes Apply the Maybelline Lash Sensational mascara to both your upper and lower lashes. Two to three coats should do it, letting each coat dry slightly before adding the next.
Step 6: Set Everything Now spray that Urban Decay All Nighter setting spray all over your face. Hold the bottle at arm's length and spray in an X and T motion. Let it dry naturally – this is when all your products meld together and become one cohesive look.
Step 7: The Final Touch Apply the NYX Butter Gloss in Brownie Drip to your lips. You can apply it generously for full glossiness or just dab it on for a more subtle look.
And there you have it! The complete latte makeup look that's perfect for literally any occasion.
Why This Look Works So Well
The beauty of the latte makeup look is that it's harmonious. Everything works together because you're working within one color story – warm, neutral, creamy tones. There's nothing fighting for attention or clashing with anything else. It all just flows.
It's also incredibly wearable. You're not going to look back at photos from today in five years and cringe. Neutral, classic makeup is timeless. Plus, it's appropriate for everything. Job interview? Perfect. First date? Great. Grocery shopping? Why not look gorgeous while picking out produce?
The products I've shared with you are all workhorses – they're reliable, high-quality, and worth every penny. Some are drugstore, some are mid-range, and some are a bit of a splurge, but they all earn their place in your makeup bag.
Final Thoughts and Tips
A few last things to keep in mind:
- Blend, blend, blend. The key to this look is seamless blending. Take your time. There's no rush.
- Less is more. You can always add more product, but it's harder to take it away. Start light and build up.
- Adapt to your coloring. While these products work on many skin tones, you might need to adjust shades. The technique and color story remain the same, but find the versions of these products that work for your unique complexion.
- Practice makes perfect. If it doesn't look perfect the first time, that's okay! Makeup is an art, and like any art, it takes practice.
- Have fun with it. Makeup should be enjoyable, not stressful. Put on some music, give yourself plenty of time, and enjoy the process.
The latte makeup look isn't just a trend – it's a vibe, a lifestyle, a way of approaching beauty with ease and confidence. It says, "I woke up like this" (even though you definitely didn't, but nobody needs to know that).
So go ahead, treat yourself to these products, create this beautiful look, and get ready for all the compliments about how radiant and gorgeous you look. You deserve it!
What do you think? Are you ready to embrace the latte makeup aesthetic? Let me know in the comments which product you're most excited to try!
Disclaimer: This post contains Amazon affiliate links. When you purchase through these links, I may earn a small commission at no extra cost to you. I only recommend products I genuinely love and believe in. Prices and availability are subject to change.


